• Skip to main content
  • Skip to primary sidebar

Training for Translators

Classes for translators and interpreters

  • Start here
  • Blog
  • Classes
    • Coaching for freelancers
    • Subscription
  • Books
    • Translate my books
    • Book Shop
  • About/Contact
    • Privacy Policy
  •  
  • Account

Apr 22 2026
Corinne McKay

How is this year going so far?

Corinne McKay (classes@trainingfortranslators.com) is the founder of Training for Translators, and has been a full-time freelancer since 2002. An ATA-certified French to English translator and Colorado court-certified interpreter, she also holds a Master of Conference Interpreting from Glendon College. For more tips and insights, join the Training for Translators mailing list!

How is this year going so far? 

Last year in the freelance world was kind of crazy (that’s the technical term). Translation really felt the fallout from ChatGPT, with many, many agencies moving to AI-generated first drafts with human editors. That resulted in a lot less work, or a lot less interesting and lucrative work, for a lot of translators, meaning that a lot of translators looked for in-house jobs or left the language professions entirely. Other freelancers were scrambling for different kinds of work, all of a sudden getting a lot more interested in direct clients, interpreting, “pure” writing, and other services that aren’t so affected by AI. Let’s take a look at how all of this is shaking out, in my world and in what I’m hearing from other people. 

In my opinion, March-April is a good time to do an initial assessment of how the year is going. You have enough data to see some trends, but still enough time to course-correct if things aren’t going well. Mostly, I hope that this analysis helps you to do your own! 

For me, things are good, and somewhat different 

As I wrote about and talked about in January, 2025 was my highest-earning year in 20+ years of freelancing. And yet, I achieved at least some of that by doing the things I tell other people not to do, namely working a bit too much, and having a scarcity mindset about interpreting (“I have to take anything and everything or I’ll have no work”). 

Things this year, I’m happy to report, are looking better in both of those departments. I set a goal of taking more time for yoga and music on weekdays (I almost never work on weekends, but that’s when I tend to do big outdoor things like skiing, hiking, and mountain biking) and I’ve been able to follow through on that. I’ve been going to yoga an average of three times a week, my lute duet partner and I performed at a small community event, and I played in a cello choir through Denver Adult Strings Camp. I feel a lot more rested and more balanced, and I don’t have the “hatchet over my neck” feeling as if I have to be working every single second during the week. 

I’ve read six books on paper so far this year (mini reviews to come in December!) and listened to six audiobooks, after deciding that my mental health needed a break from political podcasts. I’ve also branched out with my own professional development, taking Lizzie Davey’s class Create Better Content (not an affiliate deal) and speaking on AI-era diversification at the virtual conference of the American Society of Journalists and Authors. Finally, I’ve given myself time to do some “just for fun” writing and translation, including a couple of new “frustrated travel writer” blog posts about why I decided to get a United Quest credit card and how I spent part of the last two summers climbing 14 of Colorado’s 14,000-foot peaks. 

The question is whether this improved balance affects my income. That’s still to be determined. This year to date, I’ve earned $41k after deducting payments to my online course guest instructors. That’s less than the $49k I had earned at this time last year, but I’m still on track to earn around $140k, which is fine with me given that I feel like I’m working a lot less. 

Details about my workflow

Admittedly, I need to get (much) better about time tracking. I really am a data person, but time tracking is the one thing that I just can’t force myself to do. I realize that the vague feeling that I’ve had more free time is not really valid, but it’s all I’ve got right now. I’ve also:

  • Landed a new retainer client for corporate writing: this is a translation company where I ghostwrite the CEO’s LinkedIn, write the company newsletter, make white papers into blog posts, etc. I like this work and it meets my income goals. 
  • Landed a new interpreting direct client, through a referral. This is somewhat unique because I interpret mostly for agencies, but I really like the client and the work.
  • Did a couple of fairly large translation projects for my direct law firm clients. This reinforces my opinion that legal translation has been either completely eaten by AI, or the lawyers don’t care about AI, and not much in between. 

What I’m hearing from other people

I’m always at risk of being overly and illogically positive. That seems like a good characteristic, but it can cause me to think that things are fine, when they’re very much not fine. However I do feel that a lot of the AI fallout, in the translation world at least, has fallen. I personally don’t feel that AI is a bubble (sadly). I think that it saves too much time and money, particularly for clients with tight budgets and low quality standards (sorry, true, in my opinion) to go back in the tube. 

But I do feel that a) maybe we’re through the worst of the AI slash-and-burn; clients who are going to go all in on AI have already gone there, b) maybe clients in the language business are becoming more discerning about how and when they use AI, and c) definitely, in my experience, there’s good work to be had in getting clients out of the AI slop. 

This winter, I spoke at a really interesting event for translation students at Kent State University, where a lot of these factors were very apparent. Kent’s programs are a lot smaller than they used to be, and yet the students who are there are pretty fired up about their prospects. A number of them stressed that the job formerly known as translation is now going by a variety of names: 

  • “Language lead” is likely to be mostly translation 
  • “Linguistic data analysis” involves a lot of translation 
  • “Language QA,” also a lot of translation 
  • “Bilingual content specialist,” basically a translator 

As always, most people don’t really embrace change, especially in a job that they really love(d) and that has changed a lot in the past few years. But I do think that there’s still a lot of good work out there, you just have to look for it in different ways. I’ve also talked to more than a handful of good translators who have completely shifted gears, to an in-house job that uses their language skills but isn’t totally focused on translation. Personally, I give this a thumbs-up. It’s way better to adapt than to pine for what used to be! 

With that, onward into the rest of Q2 of this year. If you want to tell me how things are going for you, just leave a comment!
Written by Corinne McKay · Categorized: Uncategorized

Apr 20 2026
Corinne McKay

Travel: Climbing some of Colorado’s 14,000-foot peaks

Corinne McKay (classes@trainingfortranslators.com) is the founder of Training for Translators, and has been a full-time freelancer since 2002. An ATA-certified French to English translator and Colorado court-certified interpreter, she also holds a Master of Conference Interpreting from Glendon College. For more tips and insights, join the Training for Translators mailing list!

Although I love hiking, I’ve never really had a passion for climbing the Colorado 14’ers; the 58 mountains in Colorado that are over 14,000 feet and that meet the definition of being a 14’er. I climbed exactly one 14’er in the first 20 years that we lived in Colorado, and that was only because some friends proposed doing Mt. Bierstadt (one of the easiest) with our families when the kids were little. But between 2012 and 2024, I climbed zero 14’ers!

For a variety of reasons, 14’er fever hit me in 2024. Typically, my husband and I spend most of the summer mountain biking, but he was laid up with an injury, while my daughter (who has had 14’er fever for a while) was home from college for a few weeks. In the end, I hiked nine peaks that summer (Quandary, Sherman, Elbert, Grays/Torrey’s, and Democrat/Cameron/Lincoln/Bross) which got me to 10 total. Then it seemed like a cool goal to hit 14 total, so in the summer of 2025 I did Huron, Yale, and Belford/Oxford), and now I’m “thinking about thinking about” trying to get to 25 total before I turn 55 in September 2026 (we’ll see!).

How hard are 14’ers and how do you research them?

If you have any interest in 14’ers, I would start with 14ers.com, its corresponding app, and its Facebook group. I like the website/app for basic research. It has the elevation, trail information, and access descriptions for all 58 peaks, plus lots of helpful categories like the easiest 14’ers. The Facebook group is very helpful for real-time information (snow conditions, can you get to a certain trailhead in a certain type of vehicle).

Access is an issue with some 14’ers. Some trailheads are accessible only with a high-clearance all wheel drive vehicle, otherwise you have to park at a lower trailhead and walk up, and some of those walks can be long. Some trailheads, especially for the peaks closest to Denver, get very crowded on weekends. The 14’ers Facebook group has stories of people getting shut out before 5 AM to climb Bierstadt. On a couple of the peaks, the summit is on private land, so you can’t hike to the true summit. This was the case with Bross when my daughter and I did the Decalibron (a four-peak loop combining Democrat, Cameron, Lincoln, and Bross). Yet other peaks are completely on private land. Kind of crazy-cool to have a 14’er as your backyard, but land ownership in Colorado predates the 14’er checklist phenomenon. Different landowners handle this in different ways: some have a QR code electronic waiver, and some (most notably Culebra Peak as of this writing) require you to obtain a permit in advance. Point being, don’t just show up in a low-clearance, 2WD rental car and expect to drive right to these trailheads. Do your research ahead of time and find out what the road is like, whether there is trailhead parking, whether you need a permit, and what your options are if parking is limited.

Due to parking issues, especially on summer and fall weekends, there are frequent discussions on the 14’ers Facebook group about whether sleeping inside your vehicle constitutes “camping.” Most of the 14’er trailheads prohibit “camping” in the parking lot, but are you “camping” or “taking a nap in the back seat of your car” if you’re sleeping there ahead of a hike. Opinions vary on this! I’ve never done it, but I have slept in my car at a legal, dispersed campsite before climbing Huron Peak, and that worked out fine.

The next thing a lot of people wonder: how hard are these things to climb? Of course, it depends. Your fitness level, acclimatization, etc. are hugely important, and there’s a lot of variation across 58 peaks. I’m focusing only on the Class 1 and 2 peaks, which means that you just walk. You don’t climb using your hands for balance (other than a few short sections, like the top of Mt. Yale), and you definitely don’t climb using a rope. But there are peaks where you can do those things if you want to!

But let’s take a stab at the “how hard” question. Everyone has pluses and minuses Mine include:

  • I’m in decent shape and I love long hikes
  • I’m a relatively slow hiker
  • When I hike, I dislike stopping. I really only stop if I need to eat or drink, I rarely/almost never stop just to take a break.

All of these factors will contribute to your assessment of “how hard”? But for reference, here’s my round-trip time on all of these hikes so far. This is door-to-door, including hiking time and breaks, via the standard route unless otherwise specified. Again, with the caveat that I’m a slow hiker but I don’t stop much.

  • Quandary: 6 hours
  • Sherman, from the Leadville side: 4 hours
  • Elbert, from Halfmoon Creek: 7 1/2 hours
  • Gray’s/Torrey’s: 6 1/2 hours from the upper trailhead, but this does not include walking three miles up the access road (got a ride on the way back)
  • Democrat/Cameron/Lincoln/Bross: 6 1/2 hours
  • Huron: 7 1/2 hours from the 2WD parking lot, but this includes spending a fairly long time on the summit to wait for friends
  • Yale: 8 hours from the Denny Creek side
  • Belford/Oxford: 10 hours, but this includes both peaks and taking the longer (Elkhead Pass drainage) way down

An additional factor is altitude, especially if you live at sea level. We live in Boulder (5,430 feet) and the altitude still affects me, and there’s really no way to “train” for altitude other than being there, unless you go all in on something like an acclimatization tent at your house. It’s also important to note that you can get actual altitude sickness above around 8,000 feet, and certainly above 10,000 feet, so you should know the signs and descend immediately if you feel sick.

Altitude gets more tolerable as you acclimatize, so if you have an option to stay in the Colorado high country for a week to 10 days, you’ll feel better!

Preparation and gear

It’s pretty amazing to me, and I mean this as a data point, not a judgment, how many unprepared people you see on 14’ers, in terms of both physical training and gear. Always a few people in jeans and Crocs, always a few people carrying a water bottle, a protein bar, and not much else (which might work if you’re trail running, but not for an all-day hike), always a few people who walk for 10 minutes and stop for 30 minutes and lots of people who seem relatively unaware of the risk of being struck by lightning.

Everyone should do 14’ers in the way that makes them happy, as long as you’re not causing a risk to other people. My preparation includes:

  • Mentally acknowledging that it’s OK to turn around at any time. When people say that the mountains aren’t going anywhere, they’re right. If something feels “off” or a storm rolls in, better to get down alive and try it another time.
  • Taking enough food and clothing to spend a night outside if things really go to heck (someone gets seriously sick or hurt). It might not be a pleasant night, but I want that safety margin.
  • Starting early enough to be off the summit before 12. Because I’m slow, this generally means getting up at 5 AM and being on the trail by 6.
  • Checking multiple weather forecasts. I usually try to compare NOAA, Apple Weather, and Mountain Forecast. Even with all of those sources, we’ve had hikes where the weather was significantly better, and significantly worse than what was predicted. Which underscores the importance of having a goal but being willing to turn around.
  • Pacing. It took me a long time to learn that at least for me, the slowest continuous pace is still faster than stop and go. You see a lot of people on 14’ers who are fast when they’re moving, but they’re moving only about 50% of the time. This isn’t a criticism; you do you, that’s part of the enjoyment. But if you’re slow, I think you’re better off focusing on a sustainable pace rather than pushing yourself and having to stop a lot.

My gear includes:

  • Good boots that don’t give me blisters, currently the Asolo Finder, because I found a good deal on a nice pair that had been worn once. For 14’ers, I prefer boots (not trail runners) with a rigid sole and some ankle support. This is not the case for flatter, smoother trails. For example I did Grand Canyon Rim to Rim (the subject of a future post!) in Altra trail runners and I was glad to not be wearing boots for that.
  • Good socks (I’m a fan of Ballega and Darn Tough)
  • A Garmin InReach mini satellite communicator. I know that opinions vary on these, but I’m a believer, especially since my husband did end up pulling the SOS on ours, on a backcountry ski trip two years ago (everything turned out fine). Carry the InReach (or any similar device) on the outside of your pack, in a spot where you can reach it with your dominant hand. I put mine on a miniature locking carabiner on the front of my left pack strap.
  • A good backpack. I use the appropriately named Camelbak Fourteener with a three-liter water bladder. It has a lot of carrying capacity and I find it very comfortable.
  • Food. Lots of food. I’m in general a food girl and not someone who “forgets to eat,” but on long hikes I tend to lose my appetite. I check my watch and force myself to eat approximately every hour and a half to two hours. Generally I don’t take a “meal,” just a ton of different snacks so that I have lots of options. I like to mix up protein-y things (Aussie Bites, Kind bars, peanut M&Ms, salted mixed nuts) with some pure sugar (Nerds gummy clusters, chocolate covered salted caramels), and some salty stuff (corn chips, peanut butter crackers). This way, there’s almost always something that seems appealing. If it’s likely to be hot, I also take a separate one-liter bottle of Liquid IV or a similar electrolyte drink, and I always have a couple of emergency nutrition items like a caffeinated gel and an extra packet of electrolyte drink powder, figuring that I could eat it if needed.
  • First aid kit. Definitely take at least the basics: bandaids, medical tape, blister kit, Ace bandage, sunscreen, ibuprofen or Tylenol, lip balm
  • Layered clothes and a waterproof jacket and waterproof gloves or mittens. I have a pretty basic Patagonia shell jacket and a pair of windstopper gloves, then I always take a sun hat, a warm hat, a packable down jacket, and an additional layer like a fleece pullover. When you’re packing clothes, you need to think not just of how you feel when you’re hiking, but what happens if you have to stop for an extended period of time because of weather, someone feels sick, gets hurt, etc. etc. And the usual clothing rules: no cotton, quick-dry fabrics only, and watch out for fabrics that chafe, because you’re going to be swinging your legs and arms for a long time.
  • Trekking poles. I love my poles and I never do strenuous hikes without them. My husband got me the REI Flash carbon poles as a gift, and they’re great. I like them for balance, and because it gives your arms something to do while you’re walking.
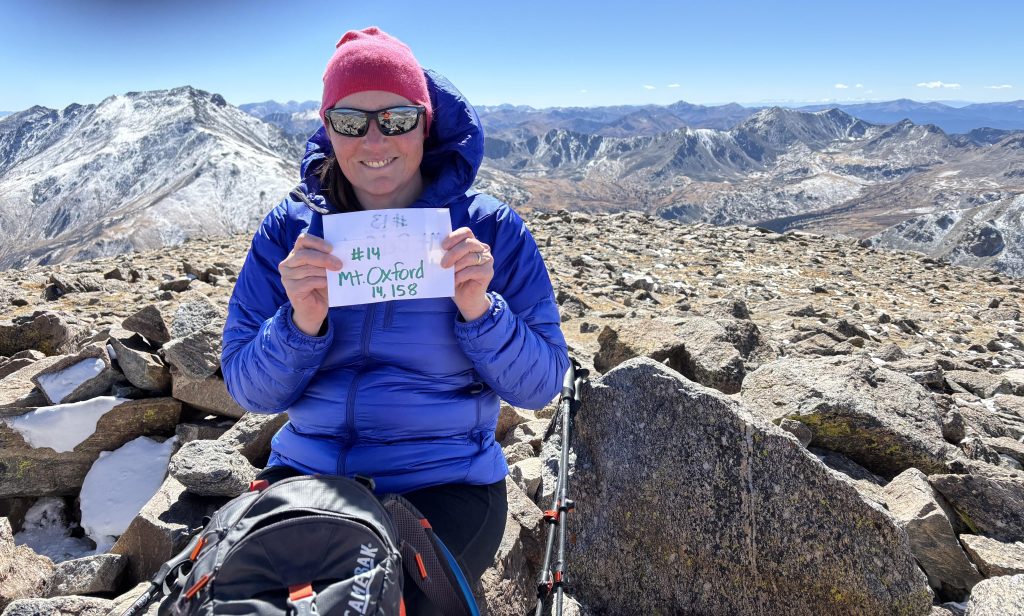
  • A sign for the summit!! No kidding! It’s totally a thing on 14’ers. People haul all kinds of commemorative signs up there! I’m not that creative or energetic, but I do take a piece of paper with the name of the peak, the summit altitude, and how many 14’ers it makes for me.

Access information and my favorite hikes

I’ve really enjoyed all of the 14’ers that I’ve done; there are none that I would put on the “never again” list. To be fair, this is probably because we live just a couple of hours’ drive from most of these peaks and I have the flexibility to go when the weather is good and the trails are less crowded. I don’t go when it’s raining, and I don’t get up at 3 AM. Herewith, a few preferences:

  • The access to Grey’s and Torrey’s is a pain if you don’t have a high-clearance vehicle. Our car, a Kia EV6, is all-wheel drive but low clearance, so we parked at the lower, 2WD parking lot and hoofed it the three miles up the road. We were able to hitch a ride back down, but I think if I did this hike again, I would rent a Jeep or similar.
  • Mt. Elbert, because it’s the highest peak in Colorado, is always crowded in terms of parking. My daughter and I did it on a weekday and got the second to last spot in the main parking area at 5:45 AM.
  • For Huron Peak, a friend and I camped in the dispersed camping area at the base of the 4WD road and that worked out well. I was glad we weren’t driving the dirt access road in the dark.
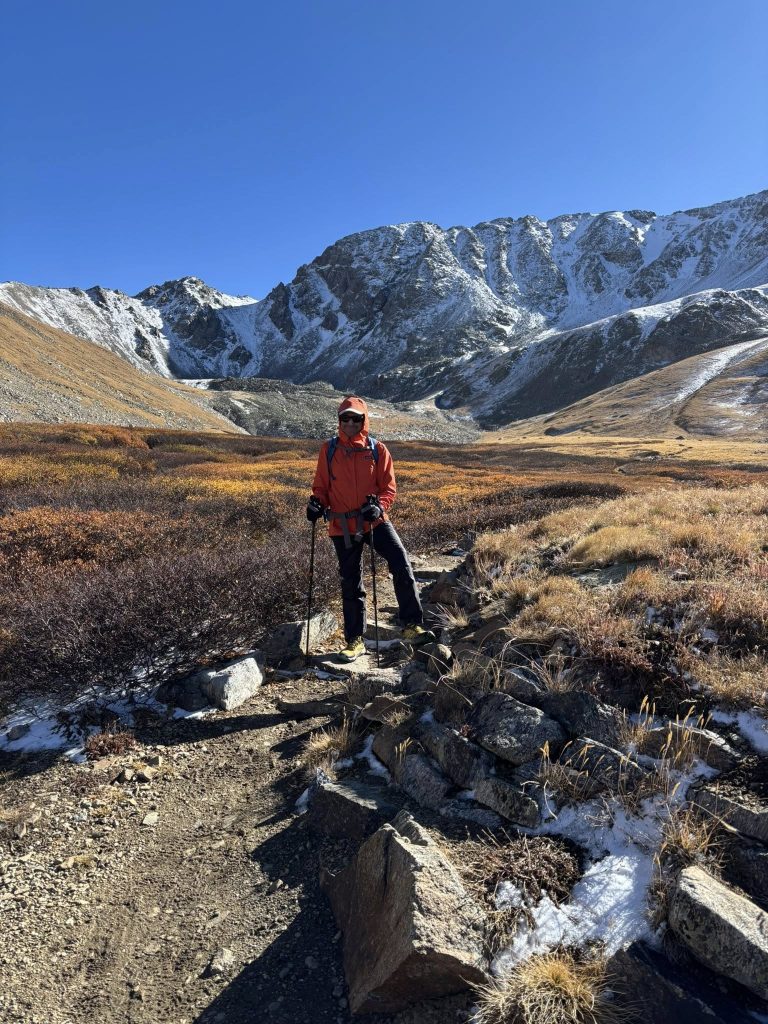
  • I would categorize Belford/Oxford plus the Elkhead Pass descent as probably the most beautiful of the hikes I’ve done (husband pictured below; we did this in October, when the light was really gorgeous!).

What’s next?!

I mean, really, who knows, right?? Lots of wild cards coming out of the deck in the world in general these days. But I have my eye on a few peaks for this summer. I’d need to do 11 more to get to 25, which feels ambitious but doable.

The access road to Mt. Blue Sky was closed last year for construction, and it’s supposed to open on Memorial Day this year, so that’s definitely on the list, as is Pikes Peak via the Barr Trail. I may do a trip down to lake Lake City and hit at least Sunshine and Handies. I still haven’t done Massive (near Leadville, a town where we often go for fun), so I feel like I have some good options and at least the potential of doing 10+ 14’ers this summer.

I hope these tips are helpful if you’re planning an adventure of your own!

Written by Corinne McKay · Categorized: Uncategorized

Apr 14 2026
Corinne McKay

How to edit and proofread your own work

Corinne McKay (classes@trainingfortranslators.com) is the founder of Training for Translators, and has been a full-time freelancer since 2002. An ATA-certified French to English translator and Colorado court-certified interpreter, she also holds a Master of Conference Interpreting from Glendon College. For more tips and insights, join the Training for Translators mailing list!

How to edit and proofread your own work 

Whether because we want to, or because we have to, many of us need good strategies for proofreading our own work; either something we translated, or something we wrote from scratch. I’m not a naturally gifted editor. In a way, this is an advantage, because I’ve had to develop robust techniques that work well for me! Let’s take a look. 

First question: How does your brain work, and what do you need help with? 

Before you dig into this question, pause and ask yourself two questions:

  • How does my brain work? Do I catch mistakes and weird phrasings more easily when I read them on a screen, when I read them on paper, or when I hear them?
  • What do I need help with? Case in point: if I don’t edit my writing, I’m repetitive and wordy (Department of Redundancy Department). Knowing this helps me identify what needs cutting and what needs some spice. 

Knowing these things is a huge first step. We tend to assume that everyone’s brain works the way ours does, and that would make for a pretty monotonous world. Brains are different. When I recently posted on LinkedIn about my passion for text-to-speech proofreading (having the computer read the document to you out loud), several people chimed in that this doesn’t work for them. “I just tune out and miss errors!” Whereas the opposite is true for me: when I visually proofread, I start skimming, and I miss errors. So, step one, figure out what works for you. 

Next question: What’s the goal of the piece? 

Sometimes, we just want to get information across, in an error-free way. Sometimes, we want to engage the reader. Knowing that is also important, because it tells you what tools to use. 

I tend to write repetitively, using the same words in the same ways. To combat this, I use an excellent book, written by a translator: Oliver Dirs’ Good Words Fast, a “unique thesaurus” that helps you replace common, tired words with more descriptive ones. 

The key: a good proofreading strategy 

Before you worry about spice and jazz, you need to eliminate errors, particularly in your translations. My go-to for this is text-to-speech proofreading, for which I use a tool called TextAloud that works as a Word plugin, and a standalone tool. What’s so great about this technique? Where do I start?:

  • I hear errors that I don’t see, for example in words that look alike (form/from)
  • I hear errors in numbers, especially “nonsense” strings of numbers like a bar code 
  • I have to slow down to the computer-reader’s pace, so I pay more attention to the sound of what I wrote
  • I hear glaring errors that I might miss on paper (where I meant “always” and wrote “never”) 

If you want to test this out, just use the Read Aloud feature in Microsoft Word. It’s right there and you’re already paying for it. It just doesn’t have as many features as a tool like TextAloud. 

Two other strategies to try if you prefer to proofread visually:

  • Paper. Obviously, this is the O.G. proofreading technique (print the translation), but it has a major downside. You then have to transfer the corrections to the electronic version, which brings the possibility of correcting the wrong thing or introducing an error that wasn’t there already. 
  • On-screen, but different. Make the text look different; put it in a totally different font, or make it into a PDF, or put it in a different orientation. Anything so that your brain doesn’t think, “Yeah yeah, I already read this 20 times.” 

Then, edit for your pitfalls 

We all have them! I use a self-editing checklist with my particular bugaboos:

  • Writing too much in general (why say in 20 words what you can say in 50?)
  • Overly long sentences
  • Not mixing up sentence length; this is something you want to do, to avoid boring the reader with sentences that all sound the same 
  • Using the same word many times
  • Overuse of emphasis (“intensely aggravating,” when it’s more emphatic to just say “aggravating”) 
  • Repeating what doesn’t need to be repeated. For example, for the sentence above, “What’s so great about this technique?” I had originally written “What’s so great about text-to-speech proofreading?” and then decided, people know what I’m talking about, I don’t need to say it again 
  • I also tend to have some inconsistencies, like inconsistent punctuation at the end of items in a bulleted list. For this I sometimes use a tool called PerfectIt, which also catches things like multiple correct spellings of the same word (gray/grey) and can edit for specific style sheet requirements. 

Read it out loud to yourself 

Some people can proofread by doing this. I can’t (same problem: I see what I want to see, not what’s actually there). But even after I’ve done the steps above, I’m surprised at how helpful it is to read the document out loud. I always catch something that sounds unclear, or repetitive, or otherwise needs tweaking. 

I hope these tips are helpful if you’re proofreading something you translated or wrote! Have a great week,

Written by Corinne McKay · Categorized: Uncategorized

Apr 13 2026
Corinne McKay

Travel: Why I succumbed to the United Quest card

Corinne McKay (classes@trainingfortranslators.com) is the founder of Training for Translators, and has been a full-time freelancer since 2002. An ATA-certified French to English translator and Colorado court-certified interpreter, she also holds a Master of Conference Interpreting from Glendon College. For more tips and insights, join the Training for Translators mailing list!

…one of a series of occasional travelogue/travel tip posts I like to write! Just search “travel” in the blog search box to find more!

When it’s time to pay attention to miles and points

I’m not a black-belt miles and points person, but lately I’ve started paying more attention to this, with airfares, and now baggage fees, rising. As I wrote about in November, my miles/points radar perked up when I got an Amex Blue Business Plus card and pretty quickly clocked enough points for a free ticket to London this summer.

Newest case in point: I started to consider getting an airline-branded credit card, if it would pay for itself through flight credits and free checked bags. I recently did this with the United Quest card, and it paid for itself in one trip! If you’re interested in this type of card, my two favorite sources of good information are Frequent Miler, and NerdWallet. Just be aware that most “credit card comparison” websites make a great deal of money off affiliate deals; analyze the information and then make your own decision!

I’ve never had an “expensive” airline credit card, and I’ve never cared much about free checked bags. As described in this post from 2023, I despise checking luggage. To be honest, I barely track the cost of checked bags, because I’m usually on the traveling light plan with my Underseat Pro backpack.

Checked bags: The cost starts to add up

Checked-bag reality hit me this winter. My family took a ski trip to Idaho and Utah over New Year’s, flying on United. For that trip, we were able to check the bags for free on my young adult daughter’s United Premier Silver status, but she was back at school by the time my husband and I flew from Denver to Kalispell, Montana in March, checking a bag of skis and poles, plus a large duffel with our ski boots, helmets, and other gear that wouldn’t fit in the backpacks we carried on (again, on United). United charged $35 per bag, each way, so this added up to a not insignificant $140 total, which got me thinking about how to avoid such a charge in the future.

To boot, United, like many U.S.-based airlines, has now raised their checked bag fees, in United’s case to $40 per bag. Some airlines have gone even further, with Southwest (another airline we fly fairly frequently) jumping from $35 to $45 for the first bag, and $55 for the second. This was the wakeup call I needed: definitely time to look at credit cards that waive these fees.

Picking a credit card: Focus on what benefits you will actually use

Sidebar: when looking at credit cards with significant annual fees (I’d say $150 a year or more), think about what benefits are actually important to you, and what benefits you will actually use. In my case:

  • Lounge access is of zero value to me. I actually enjoy the people-watching aspect of the boarding area, and if the noise is bugging me, I just wear headphones. And I don’t typically do itineraries with long layovers where the opportunity to take a shower or sleep would be of any value.
  • I don’t have the patience for a million coupons. $10 credit for Uber, but only on Tuesdays in even-numbered months? Even if I would use the coupon credits, I don’t want to deal with calculating the eligibility criteria.
  • We don’t tend to eat in fine dining restaurants or order food delivery. If you do these things, there are credit cards that might be really appealing. For example the American Express Platinum card gives you a $100 Resy credit every quarter, which is significant. But we do neither of these, so this is also a zero draw for me. Another good tip here: identify what’s not important to you and the benefits you will likely never use, even if they’re objectively appealing.

Advantages of the United Quest

After doing some research, I settled on the United Quest card. It has a $350 annual fee (not waived for the first year, you pay right away), but offers two financial benefits and one “soft” benefit that I actually care about:

  • A $200 United travel credit each year. We fly United quite a bit, so I knew that I would use this right away. In fact, I did use it for a flight I booked within two weeks of getting the card.
  • Two free checked bags for the cardholder and a companion, when you book the tickets on the same reservation. Ditto: On the first trip I booked, two checked bags were unavoidable. This meant that in the first trip after obtaining the card, I had already gotten $360 of benefits on the $350 annual fee, so we’ll put this card in the Win column.
  • Group 2 boarding. This isn’t a quantifiable benefit, but I like it because you’re pretty much guaranteed an overhead bin spot for your bag, and there’s less boarding hysteria than in the later groups. Although I love my Underseat Pro (and it has saved me from baggage fees on airlines like Frontier and Spirit that charge you for the overhead bin), it’s nicer to have the leg room if you can get it. From Colorado, it’s a four-ish hour flight to the East Coast where we have a lot of friends and family, I’m a relatively tall person, so I like to get a bin spot if possible and have some leg room.

Additionally, by spending $4,000 on the card in the first three months, I’ll get 80,000 United bonus miles. Even as a relatively frugal person, this spending goal is doable. The card is a Visa, so you can use it at Costco (the only credit card they take is Visa, otherwise you have to use debit), where we buy most of our food, and I’ve also used it to book two sets of plane tickets and a couple of AirBnBs. Overall, I’m very happy with the benefits offered by the United Quest!

Written by Corinne McKay · Categorized: Uncategorized

Apr 13 2026
Corinne McKay

How to prepare for (and pass!) an interpreting exam: master class on Thursday

Corinne McKay (classes@trainingfortranslators.com) is the founder of Training for Translators, and has been a full-time freelancer since 2002. An ATA-certified French to English translator and Colorado court-certified interpreter, she also holds a Master of Conference Interpreting from Glendon College. For more tips and insights, join the Training for Translators mailing list!

Interpreters! If you’re preparing for an interpreting exam, this week’s Training for Translators master class is for you. How to prepare for (and pass!) an interpreting exam, coming up on Thursday (April 16). Registration is $60 and includes the recording:

The class runs for 90 minutes, and walks you through how to analyze the structure of an interpreting exam, prepare a training plan that focuses on what you need to pass, and how to avoid common pitfalls on the day of the exam.

I started interpreting from pretty much zero (could not even shadow well at the start), and I used this strategy to pass three sets of high-stakes interpreting exams on the first try. There’s a good group signed up, and there’s room for you!

Written by Corinne McKay · Categorized: Uncategorized

  • « Go to Previous Page
  • Page 1
  • Interim pages omitted …
  • Page 6
  • Page 7
  • Page 8
  • Page 9
  • Page 10
  • Interim pages omitted …
  • Page 245
  • Go to Next Page »

Primary Sidebar

Subscribe to the Training for Translators mailing list!

Getting Started as a Freelance Interpreter: Available now in print and electronic editions

Learn from our blog:

  • Struggling in your freelance business? Really, you have four options
  • T4T podcast, episode 30: A summary of my “state of freelance translation” survey
  • Survey results: The state of freelance translation in 2026
  • Focus on the clients who can afford you
  • Upcoming direct client marketing class
  • Travel: Cycling Quebec’s Tomifobia Nature Trail
  • Travel: Cycling Burlington, Vermont’s Causeway Bike Trail
  • When part of your business falls off a cliff

Search the Training for Translators blog

Copyright © 2026 · Training For Translators · Log in

This website uses cookies to improve your experience. We'll assume you're OK with this, but you can opt-out if you wish. To view this website's privacy policy, click About>Privacy Policy. Accept Read More
Privacy & Cookies Policy

Privacy Overview

This website uses cookies to improve your experience while you navigate through the website. Out of these, the cookies that are categorized as necessary are stored on your browser as they are essential for the working of basic functionalities of the website. We also use third-party cookies that help us analyze and understand how you use this website. These cookies will be stored in your browser only with your consent. You also have the option to opt-out of these cookies. But opting out of some of these cookies may affect your browsing experience.
Necessary
Always Enabled
Necessary cookies are absolutely essential for the website to function properly. This category only includes cookies that ensures basic functionalities and security features of the website. These cookies do not store any personal information.
Non-necessary
Any cookies that may not be particularly necessary for the website to function and is used specifically to collect user personal data via analytics, ads, other embedded contents are termed as non-necessary cookies. It is mandatory to procure user consent prior to running these cookies on your website.
SAVE & ACCEPT